Product
Home >> Product >> solar controller >> JaJe brand DC12-48V solar controller
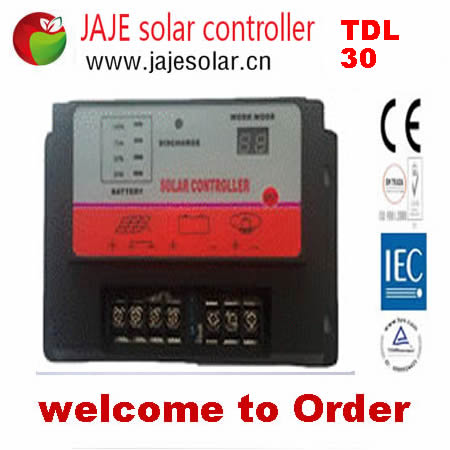
JAJE TDL3012/24V solar street lamp controller
JAJE TDL3012/24V solar street lamp controller
TDL30 solar street lamp controller An instruction manual This controller can be used in ordinary charge and discharge control and can be used for street light control 1 performance characteristics - TDL solar controller is controlled by the microprocessor, the charge and discharge management is responsible for the battery, when the battery voltage is low, automatically shut down the load (or light), to protect the battery; when the battery is full, the PWM automatically enters the floating state; when it was dark, turn off the charging loop, avoid the battery discharge by solar panels. In addition, the controller also has a perfect protection circuit to prevent accidental damage to the controller. The controller can automatically identify the 12V and 24V systems, and can automatically compensate for the temperature. TDL solar controller can be used for street lamp control, intelligent perception of external light intensity, and automatically turn on the lights on the same day, automatically turn off or turn on the lights according to the set program. TDL solar controller has 20 working modes, 1 non street lamp general controller modes, 18 street lamp working modes and 1 street lamp mode modes, which are set by users themselves. 2 connection method:
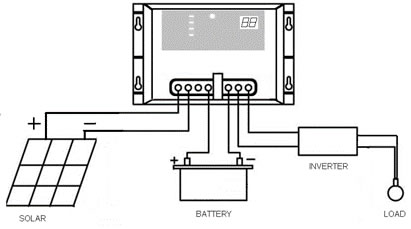
The first step is to connect the battery: the positive pole of the battery is connected to the left fourth terminal, the negative electrode is connected to the left fifth terminal, and the counter is not connected, otherwise the controller can not work. If the connection is correct, the LED will display the battery power, and the digital tube will light up for 30 seconds. Otherwise, check the battery and wiring until the first step is correct. Second steps to connect the solar panels: the positive pole of the solar panel is connected to the left side, the first terminals are connected, and the negative pole is connected to Zuo Qidi 2 or third terminals. If the solar voltage is higher than the battery voltage, the LED will have a charge display. Third steps: connect the positive pole of the load (or lamp) to the left sixth terminal, the negative pole to the left, and the seventh terminal. When the connection is not careful, do not reverse the connection, otherwise it will damage your load or the lamp. If there is no load, it can not be accessed. By wiring, we can set up the working mode needed (method see query and setup), and the default working mode of controller is 00, which is general controller mode. 3LED instructions Power starting - battery access The digital tube lights up for 30 seconds and then goes out. BATTERY lamp will show the battery power, if the battery voltage is normal, the DISCHARGE lamp will light up, indicating that there can be current output. Charging and discharging state -- solar panel access If the controller is in the charge state, the battery power indicator BATTERY will flicker in turn. If the controller is in a floating state, the battery indicator lamp will be on the BATTERY Fast flashing. If the controller is filled with a full stop state, the battery power indicator BATTERY will be fully flicker. The pressure is off. The battery is under pressure, the DISCHARGE lamp is extinguished and the output is disconnected. If the battery voltage rises to the recovery voltage, the output is automatically restored, and the DISCHARGE light rises. Load short circuit or overload: DISCHARGE lights, but no output, may load short or overload, fuse failure, should replace the same size fuse. ? 4 query and setup Query: the controller has a key (SET), which is used to query and set the work mode. When the digital tube is extinguished, press the SET key, and the digital tube will display the current work mode number. - set: press the SET button once on the controller, digital tube displays the current working mode, then press the SET key to enter the next time mode, press the SET key, digital tube display will turn you select the button to stop the work mode, the controller will automatically set the storage, 10 seconds after the start of work according to the new model, stop button 30 seconds after the digital tube is extinguished. 5 mode of work If the user is used for general charge and discharge control, please set the controller to mode 00 - a non street light general controller. If the user does not use the SET key, the controller will default to mode 00 - a non street light general controller. If the user is used for the control of the street lamp, please set the controller to mode 01 in the installation and debugging of the lamp. In this mode, the street lamp system is easy to debug. Before formal work, one of mode 02 to mode 19 should be selected as required. If set to street lamp working mode, when the first day is used, the controller is in the learning state. The lighting time will be inaccurate before daylight. This is a normal phenomenon. From the second day, the controller will enter the normal working state. Road lamp mode: Mode 02: Daylight 3 hours, light before daylight mode 03: dark bright 4 hours, before dawn is not bright Mode 04: Daylight 5 hours, light before daylight Mode 05: dark bright 6 hours, before dawn is not bright Mode 06: Daylight 7 hours, light before daylight mode 07: dark bright 8 hours, before dawn is not bright Mode 08: Daylight 9 hours, light before daylight mode 09: dark bright 10 hours, before dawn is not bright Mode 10: it's 3 hours dark, 1 hours before dawn, 11: 3 hours dark, 2 hours before dawn Mode 12: it's 4 hours dark, 1 hours before dawn, 13: 4 hours dark, 2 hours before dawn Mode 14: it's 5 hours dark, 1 hours before dawn, 15: 5 hours dark, 2 hours before dawn Mode 16: it's 6 hours dark, 1 hours before dawn, 17: 6 hours dark and 2 hours before dawn. Mode 18: 7 hours in the dark, 1 hours before daybreak, 19: light in the dark, light in the sky.
6 restart and failure If the controller is not working properly, the load (or the light) can be broken first, then the solar panel is disconnected, and the battery is disconnected at the end. After 1 minutes, the battery, the solar panel, the load (or the light) will be restarted. If the load is short, the fuse will be broken. The short circuit fault of the load must be eliminated first, the fuse is replaced, and then restarted according to the previous steps. If the work is still not normal, it should be sent to the distributor to repair it. 7 model and parameter Solar controller TDL30/10A TDL30/15A TDL30/20A TDL30/30A Automatic identification of system voltage 12V/24V Maximum charging current 10A 15A 20A 30A Maximum discharge current 10A 15A 20A 30A Stop charge voltage (HVD) 14.4V/28.8V Over - play protection value (LVD) 10.7/21.4V Over - play recovery value (LVR) 12.6V/25.2V 1 kinds of general mode 19 kinds of street lamp mode Output shunt single path Protection grade IP52 Ambient temperature -25 C ---+45 C Static current 12 mA Maximum loop pressure drop 220 mV Weight 280g Size 165mm*100mm*48mm (long * width * height) |


